This could be big

A short while ago I had an enquiry through my website. It was from two guys who run a business in Lye, mostly doing photographs and videos for Indian (mostly Sikh) weddings. Recently they have branched out into providing backdrops and other paraphernalia, not to the weddings themselves, but to the wedding organizers. The actual enquiry was for some supersize candle holders. After quite a bit of emailing images and drawings we eventually settled on 2 designs, and I am now making 6 samples, 3 are 1m long and the other 3 600mm long (same design, just shrunk by 40%). So I got myself some raw pine, and here are the first bits ready turned and sanded:

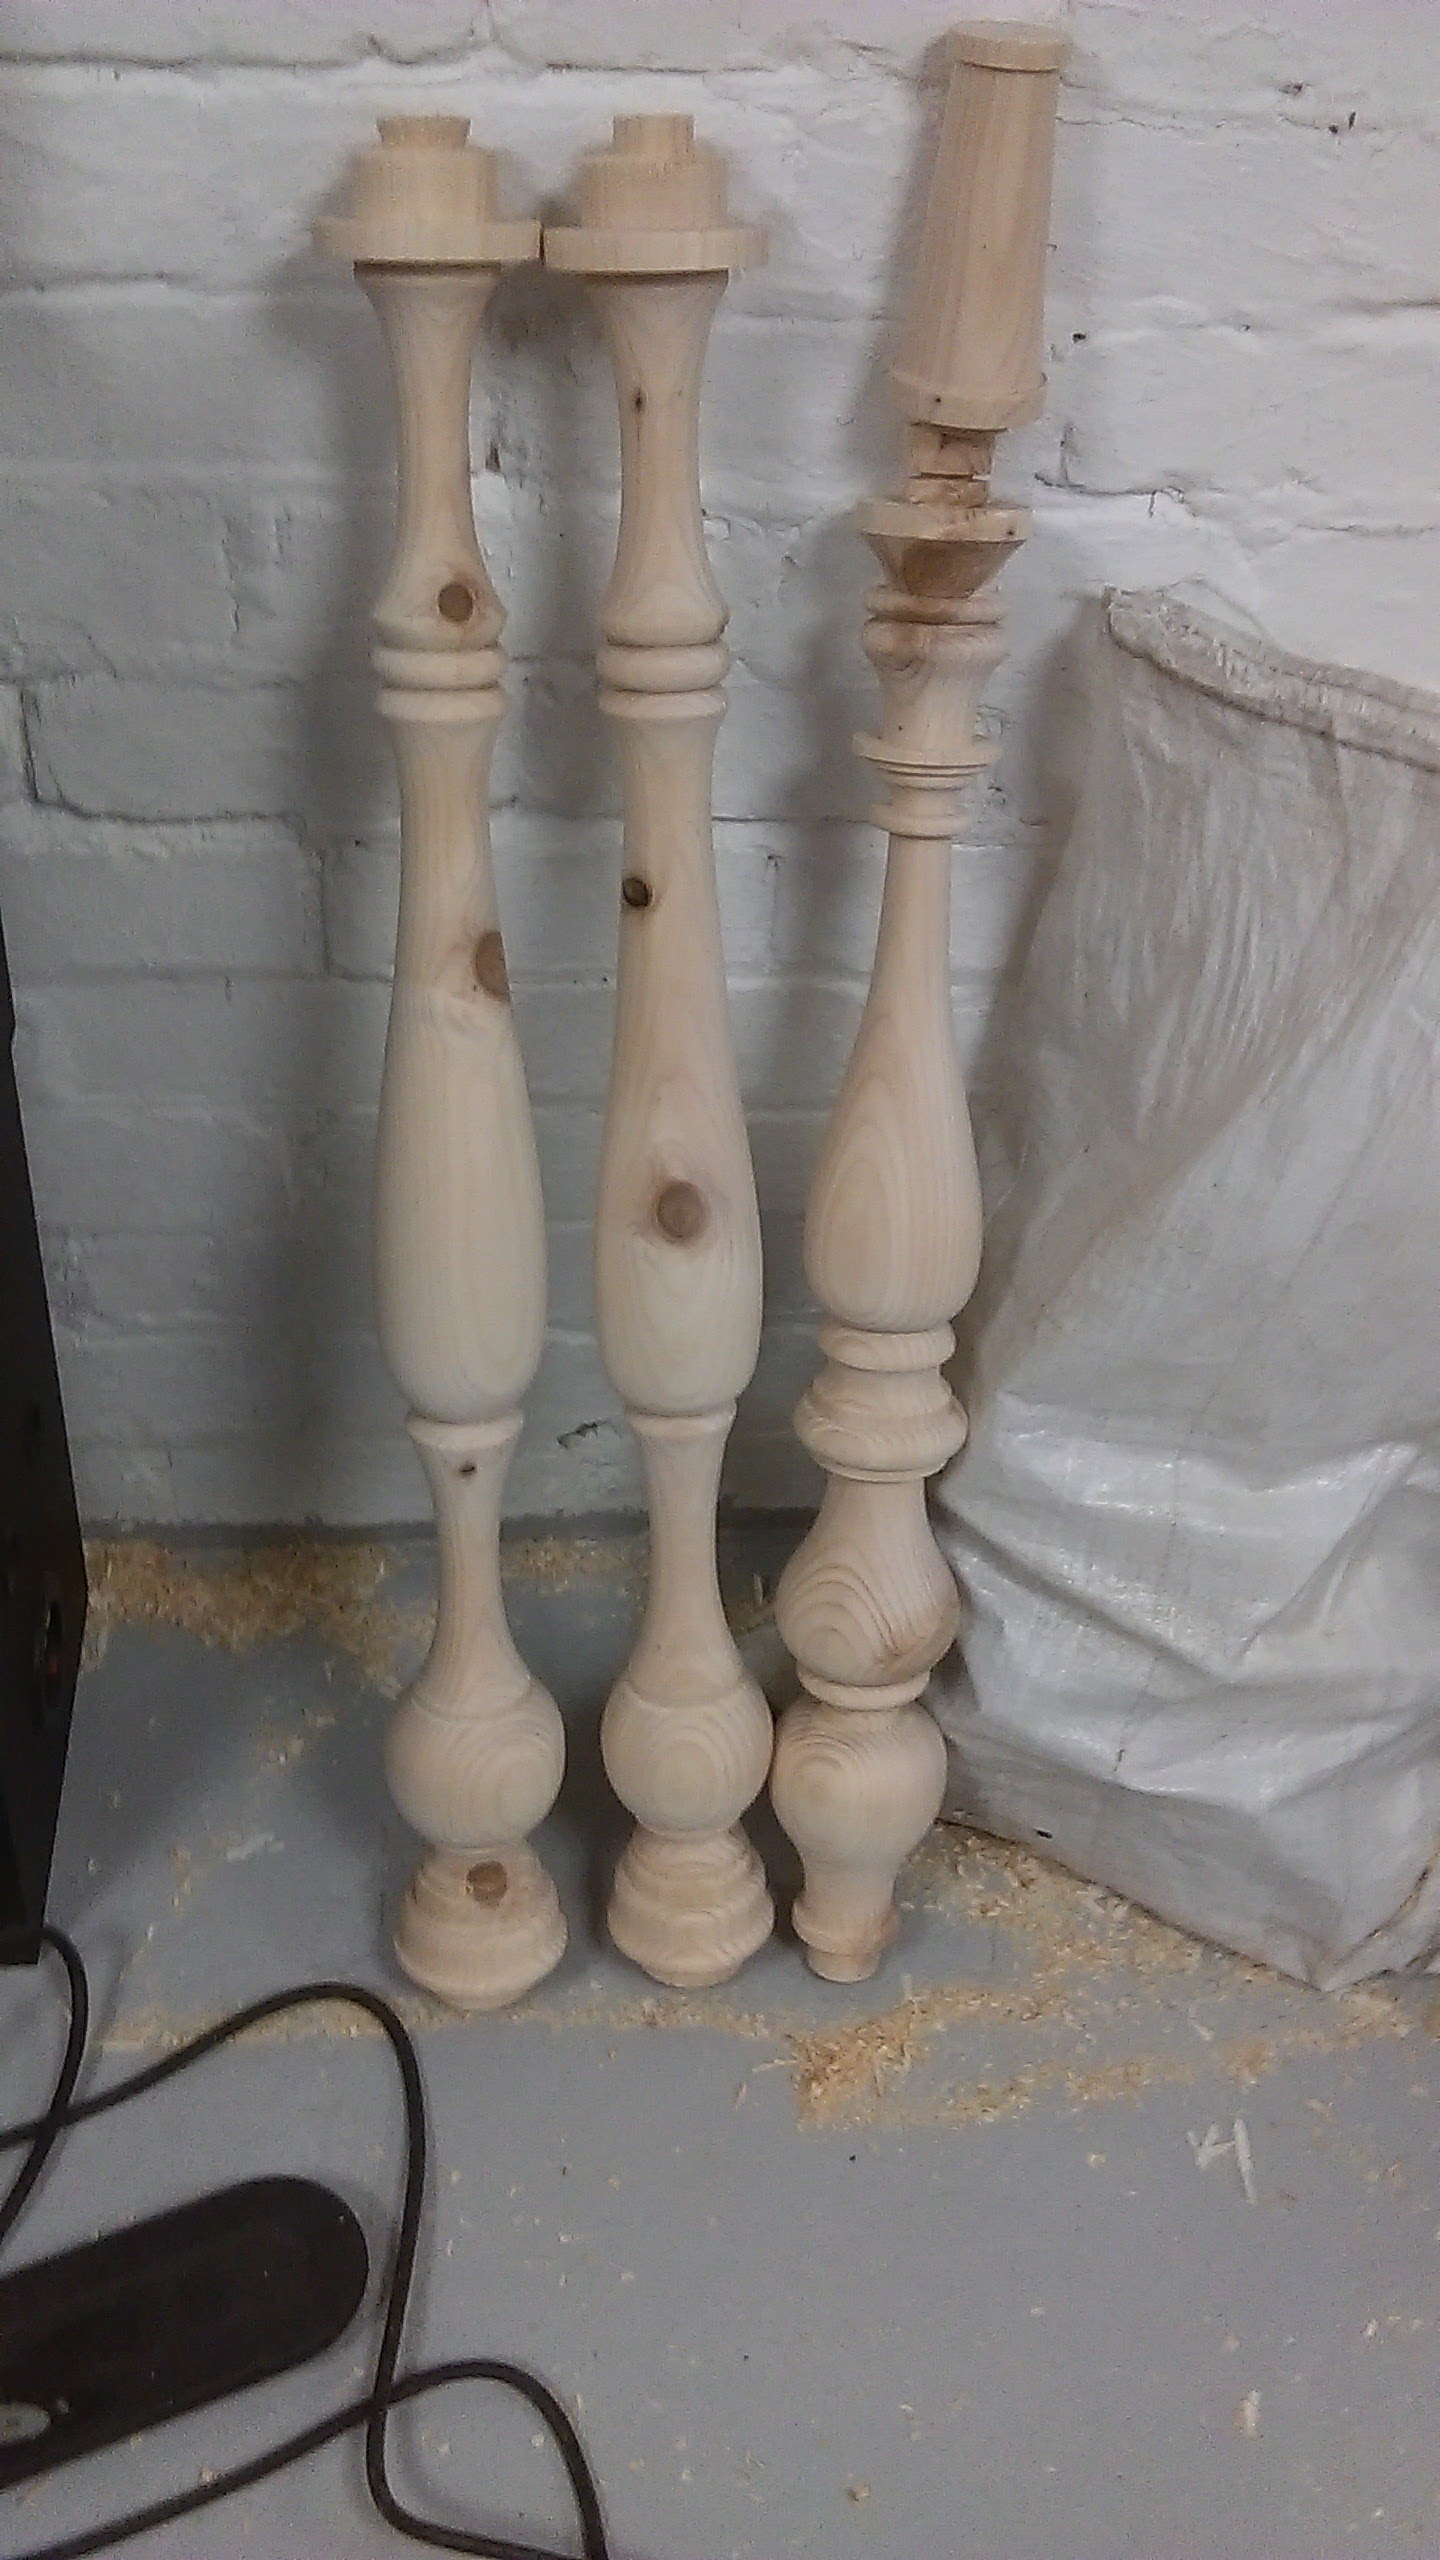
You can clearly see the two different designs, both quite traditional (a more modern design was rejected), and they do take a bit of time to make, mostly because of the size.

The pine is actually not as easy to turn as one would think. The knots are quite hard compared to the rest of the wood, and demands really sharp tools and even then there’s a lot of vibration going on.

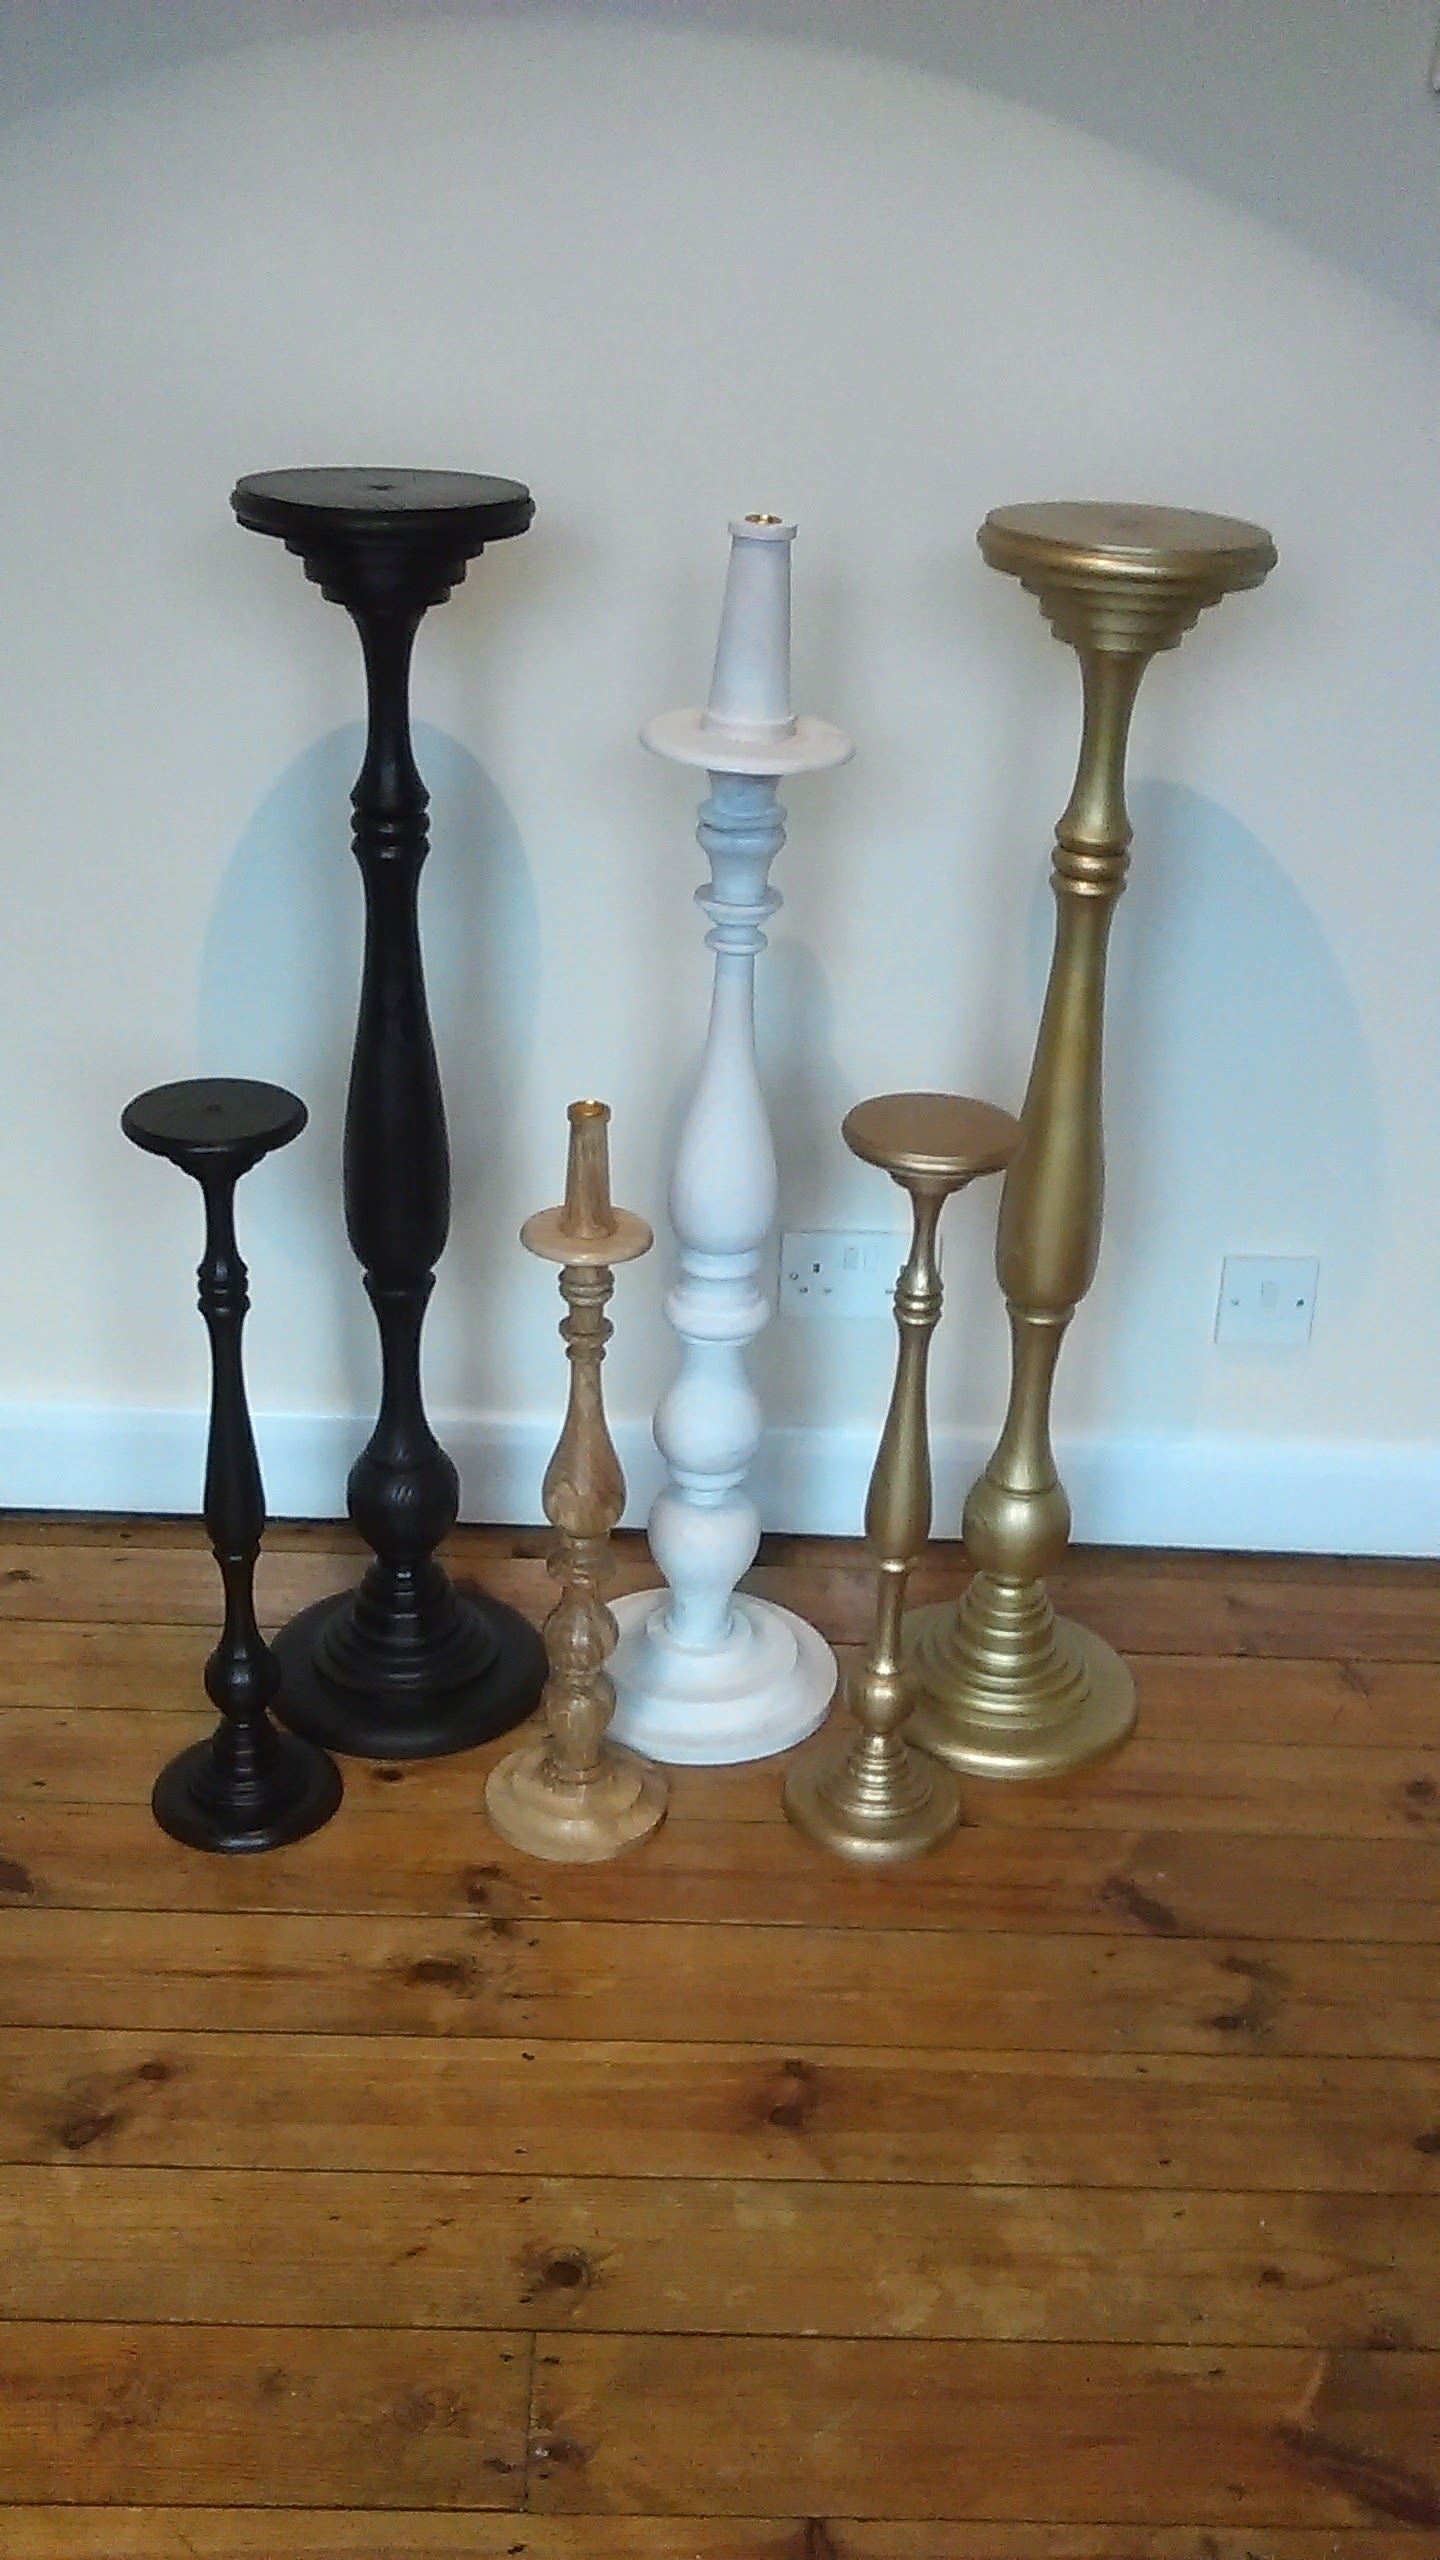
In addition, the end grain wants to rip rather than cut and some of the knots have lost bits. In other words: we will need some wood filler. However, this isn’t as bad as it sounds, because these fellows don’t want natural wood: two of the samples are to be sprayed matt black, two in gold (!!!) and two in a white wash.

According to Paul (that’s one of them), their customer will probably order around 50 or so. Well, then, as the title says: this could be big.

Update:

All 6 of them are now finished and waiting for the customer to collect. And then we’ll see how many they will order, if any at all.  It took longer than I thought, and a lot longer than I can afford if this is going to be a useful commission. And I will need a better setup for finishing them. Aerosol cans will not do the trick. Anyways: here’s a picture of them all together:

Update II:

The sticks have now been collected, and I have issued a quote for making them in batch. I am actually going to subcontract the turning to another turner, and only do the assembly and finishing myself. That’s still quite a bit job, but at least I won’t be getting tired of turning the same shape 50 times. We’ll see how this goes.


Posted in Turning | Leave a comment

Back in Business

Finally, finally!

I got some help from a friendly neighbour, and together we managed to get all the lathe pieces (wood lathe and engineering lathe) into the workshop and lifted into their correct places. I then spent most of Saturday searching through the workshop, house, garage, and bombshelter (yes, we do have one of those, too) for the box containing the correct screws. As it turns out, the taps in the legs look like M10 and measure like M10, but they are not. At least, standard M10 screws will not fit.

I finally managed to locate said box in the greenhouse. Of course, where else would it be? This was the butt of several jokes for the rest of the weekend. Well, whatever, as long as I got the bolts I needed.

The engineering lathe still needs to go back into its right place, at the moment it stands (on it’s support) in the middle of the workshop. And the clean room is anything but, it’s a mess. But we are up and running again, as far as plain old woodturning is concerned. I celebrated this on Saturday night and Sunday morning with a nice big dish in Ash, a small Cherry bowl and a tall vase from some type of Cypress or Thuja. Pictures to follow.

Posted in Turning, Workshop | Leave a comment

Situation Update (IV)

Almost 2 weeks since the last post, I must make a better effort. The workshop is now finished. Well, work on the basics is finished. The floor had its final coat of epoxy resin paint, and this looks really good and sturdy. The dust extraction system is installed, with all its outlets, and the wiring to each of the blastgates is in place. The only thing left here is to glue the microswitches to each gate (couldn’t do that, as I have until tonight not found the superglue). The drawers and cupboards are mounted in the clean room, and a 80cm deep kitchen worktop is placed across the top to create a really nice big workspace for finishing and decorating.

The base for the lathe is complete, this time with a recess for my feet and about 2″ higher than previously, as I’ve always found my lathe to be a little on the low side. The mobile set of drawers is mounted on the base with the castors, and has a plywood top and some shelves at the back mounted. The only thing left there is to screw down the Tormek, and to find all the bits and pieces of the various jigs for it.

I have mounted a flexible curtain rail around the space where the lathe will go and the curtain is on it. However, the mounting arrangements are not satisfactory. I suspect I will have to fix this some time soon. I have also mounted my dual LED worklight, this time on a rail so that I can slide it across the window, which will give my much more flexibility with regard to the actual place I am lighting up with it. Since this is now plugged into a socket (previously it was wired together with the main workshop lights) I will probably have to find a small power switch for it.

So what’s left to do:

  • I don’t have any tool racks yet in the workshop. I haven’t figured out where exactly they will be best placed.
  • The lathe hasn’t been reassembled. This evening I got the two feet out of the garage, but I will need some help with the main body.
  • The engineering lathe has not been assembled. The kitchen block on which it will sit, is in the workshop and is gathering tools, but again I’ll need help for the main body and the milling attachment.
  • The radial arm saw will need a new table, from scratch, with a new fence and a proper dust extraction hood.
  • I need to replace my old chop saw with a better one. This will then have the sit next to the radial arm saw.
  • I haven’t got a woodworking work bench. I have some of the wood, but I’ll probably need more and then need to build it.
  • There’s no distribution pipes for compressed air yet. This will need a few outlets around the workshop and also in the clean room (with a separate pressure reducer and cleaning unit, as I will want to use it for airbrushing).
  • I need a few more tools: a proper bandsaw, the above mentioned sliding compound mitre saw and a pillar drill. And probably a small planer/thicknesser. I am not currently considering a table saw, as I can’t really see the use of it, but that may change.

Right now, it’s off to bed, and then we’ll see what tomorrow brings.

Posted in Workshop | Leave a comment

Situation Update (III)

OK, as promised, now a few pictures of the new workshop. It’s clearly all very much still work in progress.

This is the view with the entrance door (a proper house door with lock and frame locks and even a mailbox) and towards the right of the door. You can see the two new windows, and on the far wall there’s the brand new distribution box with the armoured cable going in. I have a 35A supply, should be enough even with the extractor and the lathe and the heater all going at the same time. Also visible on the left edge is the cupboard I built into a recess. As you can see, it’s already filling up with “stuff”.

This is a view slightly more to the left, showing the cupboard in full with all 4 doors. It also shows the LED panels I mounted on the ceiling. They provide an excellent light, and are definitely something I’d recommend to anybody.

In front of the cupboard is the radial arm saw I inherited together with the house, a proper deWalt shop saw. I have already used it quite a bit, and it is in very good condition and works like a charm. Eventually this saw will sit back at the wall, more or less where it is now, with a sliding compound mitre saw (yet to be purchased) to its left and some decent tables left and right for longer work pieces.

In the foreground you see my makeshift work bench, two simple ??? with a 2 pieces of 2×2 mounted on the top to allow cutting and assembly of bigger items (such as cupboard frames and doors). This will eventually disappear, and I will keep the trestles underneath the tables for the radial arm saw.

Now a view towards the other end of the shop. In the foreground is the table of the radial arm saw and in the middle on the right you can see the same makeshift work bench, and the a doorway through into the small room on the left hand side of the shop, with the 2 doors for the cupboard in that room leaning against the wall.

Now we move into the small room on the right of the entrance door. It’s about 3.3m x 3m, and will become my “clean” room, meaning I will use it mainly for painting and decorating. At the same time it will house my chip extractor and compressor, and what you see in the picture is the soundproof cupboard I am building for these two items. The windows have triple glazing (wasn’t that much extra money) and with the sound proofing I should be able to work at night without disturbing the neighbours (always an important consideration!!!).

At this point, the insulation has been fitted, and you can see some wooden slats with foam screwed to them, in readiness for some wall pieces to be hung onto the French cleats. However, I have change my mind about that. Since I don’t actually need to have solid walls in there, I have now simply clad the entire inside with cloth (dust sheets from a recent paint job in the house), as you can see on this next picture.

So here we have the same cupboard, but now with the cover in place. As you can see, there’s a double plug point for the chip extractor and the compressor, and behind the cover on the top and right, there’s a cutout in the backboard and the insulation to allow the dust extraction pipe to come through. There’s also space in that opening for the compressed air pipe to go out and for a bundle of cables, which will give me a switched extractor (microswitches on each blast gate, wired up to a relay which will activate the extractor whenever a blast gate is opened, saves a lot of walking).

The frame on the floor is where the support shelf for the items will rest, dampened against the floor. We’ll see how well that works.

And finally a view of the rest of the “clean” room. Where the camvac sits on the floor, there will be two kitchen drawers units (salvaged from the old workshop), one left and one right, with a 80cm or 90cm deep worktop across as work surface. Two wall units will be hung on either side to provide storage for paints, lacquers, dyes and stains and whatever other things are needed for finishing.

So there you go. I’ll probably publish another set of pictures once everything is in place and still in pristine condition. Apologies for the slightly shaky quality, these were all taken with my mobile phone.

Posted in Workshop | Leave a comment

Situation Update (II)

Just a quickie, really. Work is progressing well on the new workshop, albeit not at the speed I was hoping for.

The lights are installed, and boy, they are good! Very even, very white light. Almost like the inside of a doctor’s surgery. The new windows and the new door are installed, in the end I got them with triple glazing, as it was very little extra money. They are almost completely soundproof.

On the floor, I managed to get the damp proof primer down, and one part of the workshop also had its first layer of the actual floor paint. Looks very good. However, it needs temperatures > 7 degrees and it must be dry. Since of late this wasn’t really the case, I started doing other stuff.

Over the last week I built a big cupboard on one side of the main shop area, that’s now complete (and already filling up), and I am almost done with the soundproof cabinet for the chip extractor and the compressor.

That’s all for now. I promise, next time I will have some pictures, and more details. Hopefully around the middle of March I can actually get the lathes in the shop and start turning again. Can’t wait!!!!

Posted in Workshop | Leave a comment